Common Web Mapping (CWM) Client

User Acceptance Test Plan

Revisions

Version Date Author Comments
v1.7.0 2016-07-26 Vivid Solutions Updated based on comments from testing.
v1.7.1 2016-11-04 Vivid Solutions Bug fixes.
v1.7.3 2017-07-30 Vivid Solutions Add support for server-side PDF rendering via Map Image Service.
v1.8.0 2018-01-01 Vivid Solutions Changes to selection, search, AOI
v1.8.1 2019-03-01 Vivid Solutions Bug fixes
v1.9.0 2019-07 Vivid Solutions Bug fixes

User Acceptance Test Plan

This User Acceptance Test (UAT) Plan covers aspects of the CWM Client user interface that are not covered by automatic unit tests.

Introduction

The purpose of these tests is to exercise the user interface of the CWM client. These tests are grouped by functional area.

The tests are tagged with the CWM version that introduced the feature. Use the checkboxes below to control which version's tests are visible.

Version Filter

Click the button below to download a blank spreadsheet that you can use to record your test results. This spreadsheet will contain only the tests allowed by the version filter.

Download Spreadsheet for Documenting Test Results

Overlays and Layers

These are tests relating to the layer panel and the behaviour of overlays and layers.

Upload a shapefile (v1.7.0)

Functional requirement

Add Layer lets user upload a shapefile

Setup

Load Showcase !showcase application.

Refer to Import examples for information on obtaining example files for testing.

The file needed for this test is valid/3-polygons.shp.

ActionExpected Result

1.

Click button.

2.

Click button.

3.

Click Choose file and select valid/3-polygons.shp from the location on your machine where the import examples were unzipped.

  • A message saying Ready to import 3 feature(s) is displayed.
  • The title field contains 3-polygons.

4.

Enter test shapefile as the title.

5.

Choose the purple colour block.

6.

Click the Add button.

  • The map zooms and centers on the features in the shapefile.
  • The 3 polygon features are displayed on the map in purple.
  • The layer list will show test shapefile at the top, under User Layers.

7.

Click button.

  • The default color is blue.

8.

Click Choose file and select valid/3-polygons.shp from the location on your machine where the import examples were unzipped.

9.

Click the Cancel button.

  • The map doesn't change.

Upload other file types (v1.7.0)

Functional requirement

Add Layer allows upload of other geo-data file types:

  • KML
  • GPX
  • GeoJSON
  • WKT
  • Simple text
Setup

Load Showcase !showcase application.

Refer to Import examples for information on obtaining example files for testing.

The files needed for this test are:

  • valid/3-polygons.kml
  • valid/3-linestrings.gpx
  • valid/3-polygons.json
  • valid/3-polygons.wkt
  • valid/3-polygons-collection.txt
ActionExpected Result

1.

Click button.

2.

Click button.

1.

Click Choose file and select valid/3-polygons.kml from the location on your machine where the import examples were unzipped.

  • A message saying Ready to import 3 feature(s) is displayed.

3.

Click the Add button.

  • The map zooms and centers on the features in the file.
  • The 3 polygon features are displayed on the map in red.
  • The layer list will show 3-polygons at the top, under User Layers.

1.

Click Choose file and select valid/3-linestrings.gpx from the location on your machine where the import examples were unzipped.

  • A message saying Ready to import 3 feature(s) is displayed.

4.

Click the Add button.

  • The map zooms and centers on the features in the file.
  • The 3 line features are displayed on the map in purple.
  • The layer list will show 3-linestrings, followed by 3-polygons at the top, under User Layers.

1.

Click Choose file and select valid/3-polygons.json from the location on your machine where the import examples were unzipped.

  • A message saying Ready to import 3 feature(s) is displayed.

5.

Click the Add button.

  • The map zooms and centers on the features in the file.
  • The 3 polygon features are displayed on the map in blue.
  • The layer list will show 3-polygons, followed by 3-linestrings, 3-polygons at the top, under User Layers.

1.

Click Choose file and select valid/3-polygons.wkt from the location on your machine where the import examples were unzipped.

  • A message saying Ready to import 3 feature(s) is displayed.

6.

Click the Add button.

  • The map zooms and centers on the features in the file.
  • The 3 polygon features are displayed on the map in cyan.
  • The layer list will show 3-polygons, followed by 3-polygons, 3-linestrings, 3-polygons at the top, under User Layers.

1.

Click Choose file and select valid/3-polygons-collection.txt from the location on your machine where the import examples were unzipped.

  • A message saying Ready to import 1 feature(s) is displayed.

7.

Click the Add button.

  • The map zooms and centers on the features in the file.
  • The 3 polygon features are displayed on the map in green.
  • The layer list will show 3-polygons-collection followed by 3-polygons, 3-polygons, 3-linestrings, 3-polygons at the top, under User Layers.

Input geo-data (v1.7.0)

Functional requirement

Add Layer allows input of a Geomark to import as a layer.

Setup

Load Showcase !showcase application.

Refer to Geo-data examples for sample geo-data to use for this test.

ActionExpected Result

1.

Click button.

2.

Click button.

3.

Click the From Geomark tab.

4.

Copy the sample Geomark at Geomark example and paste into the text box.

5.

Enter test data as the title.

6.

Choose the purple colour block.

7.

Click the Add button.

  • The geomark properly loads into the map.

Toggle visibility of all layers in a group (v1.7.0)

Functional requirement

Turn on and turn off all layers in a group (overlay) in one operation.

Setup

Load Showcase !showcase application.

ActionExpected Result

1.

Click button.

2.

Find Mining group, and ensure that it is expanded (arrow to left of name points downward).

3.

Hold Shift key and click on checkbox to left of name.

  • All layers in the Mining group turn on at same time, as well as the group.

4.

Again, hold Shift key and click on checkbox to left of name.

  • All layers in the Mining group are turned off, as well as the group.

Adjust opacity of all layers in a group (v1.8.1)

Functional requirement

Able to adjust opacity of all layers in a group (overlay).

Setup

Load Showcase !showcase application.

Click on the Session button at top of window, select 'Search', and click Load.

For v1.8.1, make sure the width of the opacity slider is correct, particularly in IE11.

ActionExpected Result

1.

Click button.

2.

Find Mining group, and ensure that it is expanded (arrow to left of name points downward).

3.

Hold Shift key and click on checkbox to left of name.

  • All layers in the Mining group turn on at same time, as well as the group.

4.

Click on the Mining group name.

  • The Layers sidebar will be replaced by the Overlay sidebar.
  • There is slider labeled Transparent at one end, and Opaque at the other.

5.

Adjust the position of the handle in the opacity slider.

  • The opacity of the Mining layers changes.

Import a shapefile with DBF (v1.7.0)

Functional requirement

Use Import Layer to import a shapefile with its associated DBF.

Setup

Load Showcase !showcase application.

Refer to Import examples for information on obtaining example files for testing.

The files needed for this test are:

  • valid/3-polygons.shp
  • extra/3-polygons.dbf
ActionExpected Result

1.

Click button.

2.

Click button.

3.

Click Choose file and select valid/3-polygons.shp from the location on your machine where the import examples were unzipped.

  • A message saying Ready to import 3 feature(s) is displayed.

4.

Click Choose file under Select DBF file and select extra/3-polygons.dbf from the location on your machine where the import examples were unzipped.

  • A message saying Ready to import 3 feature(s) is displayed.

5.

Click Details....

  • A popup dialog titled 'Import details' is shown
  • It says the file contains 3 features, 9 vertices, 3 polygons, and 1 attribute: 'name'

6.

Click the Add button.

  • Shapefile is successfully imported into map.

Import a shapefile with mismatched DBF (v1.7.0)

Functional requirement

Use Import Layer to select a shapefile and mismatched DBF, and be prevented from importing it.

Setup

Load Showcase !showcase application.

Refer to Import examples for information on obtaining example files for testing.

The files needed for this test are:

  • valid/3-linestrings.shp
  • extra/3-polygons.dbf
ActionExpected Result

1.

Click button.

2.

Click button.

3.

Click Choose file and select valid/3-linestrings.shp from the location on your machine where the import examples were unzipped.

  • A message saying Ready to import 3 feature(s) is displayed.

4.

Click Choose file under Select DBF file and select extra/3-polygons.dbf from the location on your machine where the import examples were unzipped.

  • A message saying SHP and DBF files must have the same name is displayed.
  • The Add and Details... buttons remain disabled.

Details of the imported file (v1.7.0)

Functional requirement

When a file is imported, show the details of the file in a panel.

Setup

Load Showcase !showcase application.

Refer to Import examples for information on obtaining example files for testing.

The files needed for this test are:

  • valid/3-polygons.shp
ActionExpected Result

1.

Click button.

2.

Click button.

3.

Click Choose file and select valid/3-polygons.shp from the location on your machine where the import examples were unzipped.

  • A message saying Ready to import 3 feature(s) is displayed.

4.

Click Details....

  • A popup dialog titled 'Import details' is shown
  • It says the file contains 3 features, 9 vertices, 3 polygons

Open and close dialog (v1.7.0)

Functional requirement

Add layer button opens a modal dialog box. The button is located on the Layers sidebar.

Setup

Load Showcase !showcase application.

ActionExpected Result

1.

Click button.

2.

Click button.

  • The Add layer dialog box is displayed as a modal dialog, preventing interaction with map behind it.

3.

Click anywhere on darkened map.

  • Nothing happens

4.

Click in top-right corner of dialog box.

  • Closes the dialog box.

5.

Click button.

6.

Click the Cancel button.

  • Closes the dialog box.

7.

Click button.

8.

Press the Esc key.

  • Closes the dialog box.

Drag and drop file (v1.7.0)

Functional requirement

Add layer allows a file to selected by dragging the file into the dialog box. The file must be dropped on the file chooser.

Setup

Load Showcase !showcase application.

Refer to Import examples for information on obtaining example files for testing.

The files needed for this test are:

  • valid/3-polygons.shp
ActionExpected Result

1.

Click button.

2.

Click button.

3.

Find valid/3-polygons.shp in the file-system where the import examples were unzipped using Explorer/Finder. Drag that file and drop it on the file chooser under the label Select spatial file.

  • A message saying Ready to import 3 feature(s) is displayed.

4.

Click the Add button.

  • The map zooms and centers on the features in the shapefile.

5.

Click button.

6.

Find valid/3-polygons.shp in the file-system where the import examples were unzipped using Explorer/Finder. Drag that file and drop it anywhere except on the file chooser under the label Select spatial file.

  • One of 2 different things will happen (depends on browser/OS)
  • Case 1: The browser page changes to show the file that was just dropped. In this case, the browser window no longer shows Showcase, but it can be regained by hitting Back button.
  • Case 2: The browser shows acts as if the file was just downloaded. In this case, the Add Layer dialog is unchanged.

Import file with UTM projection (v1.7.0)

Functional requirement

Add layer will detect a file that uses a UTM projection and display a popup asking user which UTM zone to use.

Setup

Load Showcase !showcase application.

Refer to Import examples for information on obtaining example files for testing.

The file needed for this test is valid/3-polygons[utm10].wkt.

ActionExpected Result

1.

Click button.

2.

Click button.

3.

Click Choose file and select valid/3-polygons[utm10].wkt from the location on your machine where the import examples were unzipped.

  • A popup dialog is displayed that lists BC's UTM zones

4.

Click on UTM zone 10, Click OK.

  • A message saying Ready to import 3 feature(s) is displayed.

5.

Click the Add button.

  • The map zooms and centers on the features in the shapefile.

Import shapefile with unknown projection (v1.7.0)

Functional requirement

Add layer will offer user ability to load PRJ file for a shapefile that uses an unknown projection.

Setup

Load Showcase !showcase application.

Refer to Import examples for information on obtaining example files for testing.

The files needed for this test are:

  • invalid/projection-not-detected[utm_data_out_of_range].shp.
  • extra/projection-not-detected[utm_data_out_of_range].shx
  • extra/projection-not-detected[utm_data_out_of_range].prj
ActionExpected Result

1.

Click button.

2.

Click button.

3.

Click Choose file and select invalid/projection-not-detected[utm_data_out_of_range].shp from the location on your machine where the import examples were unzipped.

  • A popup dialog opens containing a file chooser to pick a PRJ file

4.

Use file chooser to pick extra/projection-not-detected[utm_data_out_of_range].shx from the location on your machine where the import examples were unzipped.

  • The file chooser reverts to empty as the file is not a valid PRJ.

5.

Use file chooser to pick extra/projection-not-detected[utm_data_out_of_range].prj from the location on your machine where the import examples were unzipped.

  • The name of the projection is displayed (NAD 1983 UTM Zone 9N)
  • The OK button is enabled.

6.

Click OK.

  • A message saying Ready to import 1 feature(s) is displayed.

7.

Click the Add button.

  • The map zooms and centers on the features in the shapefile.

Import file with unknown projection (v1.7.0)

Functional requirement

Add layer cannot load a geo-data file (not shapefile), using an unknown projection.

Setup

Load Showcase !showcase application.

Refer to Import examples for information on obtaining example files for testing.

The file needed for this test is invalid/projection-not-detected[invalid_coordinates].wkt.

ActionExpected Result

1.

Click button.

2.

Click button.

3.

Click Choose file and select invalid/projection-not-detected[invalid_coordinates].wkt from the location on your machine where the import examples were unzipped.

  • A message saying Unable to determine projection is displayed.
  • The Add and Details... buttons remain disabled.

Import DBF file as spatial file (v1.7.0)

Functional requirement

Add layer will give informative message if an attempt is made to load a DBF as a spatial file.

Setup

Load Showcase !showcase application.

Refer to Import examples for information on obtaining example files for testing.

The files needed for this test are:

  • extra/3-polygons.dbf
ActionExpected Result

1.

Click button.

2.

Click button.

3.

Click Choose file and select extra/3-polygons.dbf from the location on your machine where the import examples were unzipped.

  • A message saying File type must be SHP, KML, GPX, GeoJSON, ZIP, or KMZ is displayed.

Import layer and remove it (v1.7.0)

Functional requirement

After a layer is imported into the map, allow user to delete the layer.

Setup

Load Showcase !showcase application.

Refer to Import examples for information on obtaining example files for testing.

The file needed for this test is valid/3-polygons.shp.

ActionExpected Result

1.

Click button.

2.

Click button.

3.

Click Choose file and select valid/3-polygons.shp from the location on your machine where the import examples were unzipped.

  • A message saying Ready to import 3 feature(s) is displayed.
  • The title field contains 3-polygons.

4.

Click the Add button.

  • The map zooms and centers on the features in the shapefile.
  • The layer list will show 3-polygons at the top, under User Layers.

5.

Click on 3-polygons in the Layers panel.

  • The Layers sidewbar will be replaced by the Layer sidebar.
  • There is button labeled Zoom to Layer Data.
  • There is button labeled Remove Layer.

6.

Click on the Remove Layer button.

  • The Layer sidebar closes, and the Layers sidebar reappears.
  • The layer you imported is removed from the list in Layers.
  • The User Layers heading is hidden.

Zoom to visible scale for layer (v1.7.0)

Functional requirement

Button to zoom to scale where a layer will be visible

Setup

Load Showcase !showcase application.

ActionExpected Result

1.

Click button.

2.

Find Mineral Tenure layer, and click on label.

  • The Layers sidebar will be replaced by the Layer sidebar.
  • There is button labeled Zoom to Visible Scale.
  • There may be a button labeled Metadata.

3.

Click on the Zoom to Visible Scale button.

  • Map zooms to 1M scale, and Mineral Tenures will be visible.
  • The button labeled Zoom to Visible Scale is disabled (dimmed).

4.

Click on the button in navigation toolbar.

  • The Mineral Tenures are no longer visible.
  • The button labeled Zoom to Visible Scale is enabled.

5.

Click twice on the button in navigation toolbar.

  • The button labeled Zoom to Visible Scale is disabled (dimmed).

6.

Click < Layers button.

  • The Layer sidewbar will be replaced by the Layers sidebar.

Visit metadata page for layer (v1.7.0)

Functional requirement

Show a button to link to metadata page for layer.

Setup

Load Showcase !showcase application.

ActionExpected Result

1.

Click button.

2.

Find Mineral Tenure layer, and click on label.

  • The Layers sidewbar will be replaced by the Layer sidebar.
  • There is button labeled Zoom to Visible Scale.
  • There may be a button labeled Metadata.

3.

Click on the Metadata button.

  • A new browser window opens on the Mineral Tenure Metadata page.

Detect broken layers (v1.8.0)

Functional requirement

Broken layers are detected at startup and disabled.

Setup

Load Showcase !showcase application.

Click on the Profile: drop-down at top of window, and select Failing layers. Wait for Showcase to reload.

Click on the Session button at top of window, select 'Failing Layers', and click Load.

When this test is finished, ensure that Profile: drop-down is set to All tools.

ActionExpected Result

1.

Click button.

  • The layer list will contain 3 overlays.
  • The layer list will contain a total of 5 layers, 4 of which have a strike-through.
  • The map shows a few wildlife management area polygons from the one valid layer.

2.

Click on checkbox beside any of the layers with a strike-through.

  • The checkbox will not be turned on.

3.

Click on any of the layers with a strike-through.

  • The layer information panel will indicate that the layer has been disabled.

Legend

Legend show horizontal scrollbar when needed (v1.7.0)

Functional requirement

Button to zoom to scale where a layer will be visible

Setup

Load Showcase !showcase application.

ActionExpected Result

1.

Click button.

1.

Find Other Resource Layers group, and Shift-click on the checkbox beside it.

1.

Click button.

  • The legend under Wildlife Habitat Areas - Approved - Outlined is too long to display in panel, so horizontal scrollbar will be visible.

Opening scale chooser will close other popup panels (v1.8.0)

Functional requirement

Opening scale chooser will close other popup panels, like the base map and coordinate display.

Setup

Load Showcase !showcase application.

ActionExpected Result

1.

Click on the base map popup at the bottom right corner of the map.

  • The base map list pops up.

2.

Click on the map scale popup at the bottom left edge of map, above coordinate display.

  • The base map list closes, and the map scale list pops up.

Map scale can be chosen from a popup list (v1.8.0)

Functional requirement

The map scale can be chosen from a popup list.

Setup

Load Showcase !showcase application.

ActionExpected Result

1.

Click on the icon on the map scale at the bottom left edge of map, above the coordinate display.

  • The icon changes to
  • All available map scales are listed.
  • The current scale (approximately 1:17M) is bold with a dot beside it

2.

Click on 1:540,000.

  • The map zooms in.
  • The map scale shows approximately 1:542K.

3.

Click on the button.

  • The map goes back to previous extent.
  • The map scale reads it's previous value.

API can control mouse wheel zoom (v1.8.1)

Functional requirement

The map API can be used to enable and disable using the mouse wheel to zoom the map.

Setup

Load Showcase !showcase application.

ActionExpected Result

1.

Click on the Navigation button at top of window.

  • The Navigation panel opens.
  • The 'Use mouse wheel to zoom' checkbox is turned on.

2.

Use the mouse wheel to zoom the map.

  • The map zooms in and out with the wheel.

3.

Click the 'Use mouse wheel to zoom' checkbox and turn it off.

4.

Use the mouse wheel to zoom the map.

  • The map does not respond to the mouse wheel.

5.

Click the 'Use mouse wheel to zoom' checkbox and turn it on.

6.

Use the mouse wheel to zoom the map.

  • The map zooms in and out with the wheel.

API to get current zoom level (v1.8.1)

Functional requirement

The map API can be used to get the current zoom level.

Setup

Load Showcase !showcase application.

ActionExpected Result

1.

Click on the Navigation button at top of window.

  • The Navigation panel opens.
  • The current zoom level is displayed, it should be 5 (might be 6 or 4).

2.

Use the mouse wheel to zoom the map.

  • The current zoom level changes.

3.

Use the zoom buttons to zoom the map in and out.

  • The current zoom level changes.

4.

Use the zoom to province button.

  • The current zoom level changes.
Functional requirement

When the navigation tool is hovered over, a popup panel shows usage information for the tool.

Setup

Load Showcase !showcase application.

ActionExpected Result

1.

Hover over

  • A tool information panel is displayed

Coordinate Display

Opening coordinate chooser will close other popup panels (v1.8.0)

Functional requirement

Opening coordinate chooser will close other popup panels, like the base map and scale display.

Setup

Load Showcase !showcase application.

ActionExpected Result

1.

Click on the base map popup at the bottom right corner of the map.

  • The base map list pops up.

2.

Click on the coordinate popup at the bottom left edge of map.

  • The base map list closes, and the coordinate list pops up.

3.

Click on the coordinate popup arrow at at the bottom left corner of map.

  • The coordinate list closes.

4.

Click on the map scale popup at the bottom left corner of map, above the coordinate display.

  • The scale list pops up.

5.

Click on the coordinate popup at the bottom right edge of map.

  • The map scale list closes, and the coordinate list pops up.

Copy coordinates (v1.8.0)

Functional requirement

It's possible to copy the displayed coordinates to clipboard

Setup

Load Showcase !showcase application.

ActionExpected Result

1.

Click on the 'unlocked' icon beside the coordinate display at the bottom left edge of map.

  • The icon changes to the 'locked' state.

2.

Click on the map somewhere.

  • The coordinate changes to show the location that was clicked on.

3.

Select the text in the coordinate display.

  • The text is selected
  • The coordinate display is not expanded

4.

Copy the selected text to clipboard (right-click and select 'Copy' or Ctrl C or Cmd C).

5.

Open notepad or similar application, and paste text.

  • The text pasted is the coordinate that was copied.

Base Map

Opening base map chooser will close other popup panels (v1.8.0)

Functional requirement

Opening base map chooser will close other popup panels, like the scale and coordinate display.

Setup

Load Showcase !showcase application.

ActionExpected Result

1.

Click on the coordinate popup at the bottom right edge of map.

  • The coordinate list pops up.

2.

Click on the base map popup at the bottom right corner of the map.

  • The coordinate list closes, and the base map list pops up.

3.

Click on the base map popup arrow at the bottom right corner of the map.

  • The base map list closes.

4.

Click on the map scale popup at the bottom left corner of map, above the coordinate display.

  • The scale list pops up.

5.

Click on the base map popup at the bottom right corner of the map.

  • The map scale list closes, and the base map list pops up.

ESRI Basemaps display at all scales (v1.9.0)

Functional requirement

When the zoomed close into map with the ESRI basemaps, the map tile stretches instead of showing missing data warning.

Setup

Load Showcase !showcase application.

ActionExpected Result

1.

Click on the icon on the map scale at the bottom left edge of map, above the coordinate display.

  • The icon changes to
  • All available map scales are listed.

2.

Click on 1:4232.

  • The map zooms in

3.

Click on the base map popup at the bottom right corner of the map.

  • The base map chooser opens

4.

Click on 'ESRI Streets' in the base map list

  • The base map changes to the 'ESRI Streets' map

5.

Use the zoom buttons to zoom the map in and out.

  • The base map stretches, but is always displayed

6.

Repeat the previous 2 steps for 'ESRI Topo' and 'ESRI Imagery'

Search for location searches as you type (v1.8.0)

Functional requirement

Search for location starts showing results as soon as the user types enough characters.

Setup

Load Showcase !showcase application.

ActionExpected Result

1.

Click on the button

  • The Search toolpanel is displayed.
  • The Location tab is selected.
  • The input focus is in the text entry box.

2.

Type slowly into Search location entry box: Victoria

  • After V, a message says More input needed
  • After Vi, a message says More input needed
  • After Vic, a message says Searching..., followed by a message Matched 20 locations as Place Name and results starting with Vic Lake
  • After Vict and the rest of the characters, a message says Searching..., followed by results starting with Victoria - City

3.

Hit Enter/Return key

  • The map zooms and centers on Victoria, with a yellow marker in the center.

4.

Click on the next result Victor Lake

  • The map zooms and centers on Victor Lake, with a yellow marker in the center.

5.

Click in the Search location entry box, and put insertion point at end. Hit Backspace and delete one character at a time.

  • The search is performed after every change to the entry box.
  • The results stay the same until entry box contains Vic, and then results start with Vic Lake.
  • When Vi, a message says More input needed
  • When V, a message says More input needed
  • When entry box is empty, the placeholder is displayed, and no other message.

6.

Type into Search location entry box: 123 lake

  • A message Matched 20 locations as Address and results starting with 123 Lake Ave, Kelowna, BC

7.

Click on the button.

  • The search results are cleared.
  • The markers on the map are cleared.
  • The entry box is empty, the placeholder is displayed, and no other message.

Search for location detects type of location (v1.8.1)

Functional requirement

Search by location will detect the type of location being entered.

For v1.8.1, make sure the spelling in UI is correct, particularly the result from step 2.

Setup

Load Showcase !showcase application.

ActionExpected Result

1.

Click on the button

  • The Search toolpanel is displayed.
  • The Location tab is selected.
  • The input focus is in the text entry box.

2.

Type each of the following into Search location entry box and hit Enter/Return: 48.440 -123.378, 48.440 -123.378, 48.440 123.378, -48.440 123.378, -48.440 -123.378, -123.378 48.440, -123.378 -48.440, 123.378 48.440, 123.378 -48.440, 48.440 -123 22.68, 48.440 -123 22.68, -123 22.68 , 48° 26.4 0, 48 26' 24" -123 22' 40.8", 48.440N, 123.378W.

  • A message Matched a location as Lat/Long
  • One result Latitude 48.440, Longitude -123.378
  • The map centers over same location in Victoria

3.

Type each of the following into Search location entry box and hit Enter/Return: 472044 5365271 zone 10,

  • A message Matched a location as UTM
  • One result Easting 472044.0, Northing 5365271.0, Zone 10
  • The map centers over same location in Victoria

4.

Type each of the following into Search location entry box and hit Enter/Return: 1194361 384060,

  • A message Matched a location as BC Albers
  • One result Easting 1194361.0, Northing 384060.0
  • The map centers over same location in Victoria

5.

Type each of the following into Search location entry box and hit Enter/Return: 092b044,

  • A message Matched a location as Mapsheet
  • One result Mapsheet: 092b044
  • The map centers over Victoria

Search for feature can search within current extent (v1.8.0)

Functional requirement

The search for feature panel can search for features within the current extent, or anywhere on the map.

Setup

Load Showcase !showcase application.

Click on the Session button at top of window, select 'Search', and click Load.

ActionExpected Result

1.

Click on the button

  • The Search toolpanel is displayed.
  • The Location tab is selected.
  • The input focus is in the text entry box.

2.

Click on the Feature tab

  • The Feature tab is selected.
  • The input focus is in the text entry box.

3.

Click in the layer drop-down and select ALC ALR Polygons

4.

Ensure that the within visible extent is checked

5.

Click in the attribute drop-down and select Status

  • The input focus should be in the attribute value entry box

6.

Enter alr and hit Enter/Return

  • The Searched Features panel is displayed, showing a status of Searching... for a few seconds.
  • When the search completes, the status says Showing 20 features out of 24.
  • The first feature is expanded.

7.

Hover mouse over each feature in the Searched Features panel

  • The feature is highlighted on the map
  • All features are visible in the current view

8.

Turn the within visible extent checkbox off

9.

Click the button in the search toolpanel

  • The Searched Features panel is displayed, showing a status of Searching... for a few seconds.
  • When the search completes, the status says Showing 20 features out of 3234.

10.

Hover mouse over each feature in the Searched Features panel

  • None of the features are visible in the current view

11.

Click on the layer name in the Searched Features panel

  • The map is centered over all the features that the filter matched

Search for feature will limit number of results (v1.8.0)

Functional requirement

Search for feature will limit the number of search results.

Setup

Load Showcase !showcase application.

Click on the Session button at top of window, select 'Search', and click Load.

ActionExpected Result

1.

Click on the button

  • The Search toolpanel is displayed.
  • The Location tab is selected.
  • The input focus is in the text entry box.

2.

Click on the Feature tab

  • The Feature tab is selected.
  • The input focus is in the text entry box.

3.

Click in the layer drop-down and select ALC ALR Polygons

4.

Ensure that the within visible extent is NOT checked

5.

Click in the attribute drop-down and select Status

  • The input focus should be in the attribute value entry box

6.

Enter alr and hit Enter/Return

  • The Searched Features panel is displayed, showing a status of Searching... for a few seconds.
  • When the search completes, the status says Showing 20 features out of 3234.

7.

Click in select max results drop-down, and select up to 200 results.

8.

Click the button in the search toolpanel

  • The Searched Features panel is displayed, showing a status of Searching... for a few seconds.
  • When the search completes, the status says Showing 200 features out of 3234.

Search for feature can construct a complex queries (v1.8.0)

Functional requirement

Search for feature can construct a complex queries, of multiple clauses that are ANDed together.

Setup

Load Showcase !showcase application.

ActionExpected Result

1.

Click on the button

  • The Search toolpanel is displayed.
  • The Location tab is selected.
  • The input focus is in the text entry box.

2.

Click on the Feature tab

  • The Feature tab is selected.
  • The input focus is in the text entry box.

3.

Click in the layer drop-down and select ALC ALR Polygons

4.

Click in the attribute drop-down and select Status

  • The input focus should be in the attribute value entry box

5.

Enter alr

6.

Click the button in the search toolpanel

  • A new filter clause is added below the existing one

7.

Click in the attribute drop-down in the new clause and select Alr Poly Id

8.

Click in the operator drop-down in the new clause and select CONTAINS

9.

Enter 884 in the attribute value in the new clause

10.

Click the button in the search toolpanel

  • The Searched Features panel is displayed, showing a status of Searching... for a few seconds.
  • When the search completes, the status says Showing 14 features.

11.

Expand each feature in the Searched Features panel

  • Each one has an Alr Poly Id value with 884 in it

Search for feature can use various comparison operators (v1.8.0)

Functional requirement

Search for feature filter clauses can use various comparison operators, like equals, greater-than, etc.

Setup

Load Showcase !showcase application.

(The feature counts are approximate, and only accurate at the time this is written)

ActionExpected Result

1.

Click on the button

  • The Search toolpanel is displayed.
  • The Location tab is selected.
  • The input focus is in the text entry box.

2.

Click on the Feature tab

  • The Feature tab is selected.
  • The input focus is in the text entry box.

3.

Ensure that the within visible extent is NOT checked

4.

Click in the layer drop-down and select Land Act Survey Parcels - Tantalis - Outlined

5.

Click in the attribute drop-down and select Parcel Legal Description

6.

Click in the operator drop-down in the new clause and select CONTAINS

7.

Enter SOOKE

8.

Click the button in the search toolpanel

  • The Searched Features panel is displayed, showing a status of Searching... for a few seconds.
  • When the search completes, the status says Showing 20 features out of 270.

9.

Expand each feature in the Searched Features panel

  • Each one has an Parcel Legal Description value with SOOKE in it

10.

Click in the attribute drop-down and select Parcel Area In Hectares

11.

Click in the operator drop-down in the new clause and select is GREATER than

12.

Enter 50

13.

Click the button in the search toolpanel

  • The Searched Features panel is displayed, showing a status of Searching... for a few seconds.
  • When the search completes, the status says Showing 20 features out of 52269.

14.

Expand each feature in the Searched Features panel

  • Each one has an Parcel Area In Hectares value greater than 50

15.

Click in the operator drop-down in the new clause and select is LESS than

16.

Click the button in the search toolpanel

  • The Searched Features panel is displayed, showing a status of Searching... for a few seconds.
  • When the search completes, the status says Showing 20 features out of 67896.

17.

Expand each feature in the Searched Features panel

  • Each one has an Parcel Area In Hectares value less than 50

18.

Click in the attribute drop-down and select Surveyor General Plan No

19.

Click in the operator drop-down in the new clause and select ENDS with

20.

Enter ISLANDS

21.

Click the button in the search toolpanel

  • The Searched Features panel is displayed, showing a status of Searching... for a few seconds.
  • When the search completes, the status says Showing 20 features out of 812.

22.

Expand each feature in the Searched Features panel

  • Each one has an Surveyor General Plan No value that ends with ISLANDS

23.

Click in the operator drop-down in the new clause and select STARTS with

24.

Enter 11TR1

25.

Click the button in the search toolpanel

  • The Searched Features panel is displayed, showing a status of Searching... for a few seconds.
  • When the search completes, the status says Showing 20 features out of 673.

26.

Expand each feature in the Searched Features panel

  • Each one has an Surveyor General Plan No value that starts with 11TR1

Search for feature results panel allows interaction with features (v1.8.0)

Functional requirement

Search for feature results panel allows interaction with the features that are matched by the filter. The user can zoon to a feature or copy the feature to the AOI.

Setup

Load Showcase !showcase application.

ActionExpected Result

1.

Click on the button

  • The Search toolpanel is displayed.
  • The Location tab is selected.
  • The input focus is in the text entry box.

2.

Click on the Feature tab

  • The Feature tab is selected.
  • The input focus is in the text entry box.

3.

Ensure that the within visible extent is NOT checked

4.

Click in the layer drop-down and select Land Act Survey Parcels - Tantalis - Outlined

5.

Click in the attribute drop-down and select Parcel Legal Description

6.

Click in the operator drop-down in the new clause and select CONTAINS

7.

Enter SOOKE

8.

Click the button in the search toolpanel

  • The Searched Features panel is displayed, showing a status of Searching... for a few seconds.
  • When the search completes, the status says Showing 20 features out of 270.

9.

Click on each Feature row in the Searched Features panel.

  • The feature will be highlighted on the map and the map will zoom to put that feature in the center.

10.

Click on the beside each Feature.

  • The map will show each feature's geometry as an AOI feature.
  • The first one has a orange outline, and the rest have a blue outline.

11.

Click button.

  • The AOI status display at the bottom of the map will shown the same number of AOI features as there were identified features.

Search for feature respects max layer extent (v1.8.1)

Functional requirement

A layer can define it's maximum extent, and the search for tool will use this extent to restrict the area of search.

Setup

Load Showcase !showcase application.

ActionExpected Result

1.

Click on the button

  • The Search toolpanel is displayed.
  • The Location tab is selected.
  • The input focus is in the text entry box.

2.

Click on the Feature tab

  • The Feature tab is selected.
  • The input focus is in the text entry box.

3.

Click in the layer drop-down and select Mineral Tenure Grid

  • The Cell ID field is selected.
  • The operator is EQUAL to
  • The input focus should be in the attribute value entry box

4.

Enter '094C08J022B' and hit Enter/Return

  • The Searched Features panel is displayed, showing a status of Searching... for awhile.
  • When the search completes, the status says Showing 1 feature.
  • The first feature is expanded.

Search for location markers show on printout (v1.9.0)

Functional requirement

Search for location markers will show on printout

Setup

Load Showcase !showcase application.

ActionExpected Result

1.

Click on the button

  • The Search toolpanel is displayed.
  • The Location tab is selected.

2.

Type into Search location entry box: Victoria

3.

Hit Enter/Return key

  • The map zooms and centers on Victoria, with a yellow marker in the center.

4.

Click the button.

  • The Print Map dialog opens

5.

Select Quickprint from the Layout drop-down

6.

Click Print button

  • The print preview will show the search marker

Search for feature markers show on printout (v1.9.0)

Functional requirement

Search for feature markers show on printout.

Setup

Load Showcase !showcase application.

Click on the Session button at top of window, select 'Search', and click Load.

ActionExpected Result

1.

Click on the button

  • The Search toolpanel is displayed.
  • The Location tab is selected.

2.

Click on the Feature tab

  • The Feature tab is selected.
  • The input focus is in the text entry box.

3.

Click in the layer drop-down and select ALC ALR Polygons

4.

Ensure that the within visible extent is checked

5.

Click in the attribute drop-down and select Status

  • The input focus should be in the attribute value entry box

6.

Enter alr and hit Enter/Return

  • The Searched Features panel is displayed, showing a status of Searching... for a few seconds.
  • When the search completes, the status says Showing 20 features out of 24.
  • The first feature is expanded.

7.

Click on the layer name in the Searched Features panel

  • The map is centered over all the features that the filter matched

8.

Click the button.

  • The Print Map dialog opens

9.

Select Quickprint from the Layout drop-down

10.

Click Print button

  • The print preview will show the search markers

Measurement

Change measurement mode (v1.9.0)

Functional requirement

When the measurement mode is changed, the current measurement should be converted to the new mode.

Setup

Load Showcase !showcase application.

Click on the Session button at top of window, select 'Measurement', and click Load.

ActionExpected Result

1.

Click the button

  • The mode is active
  • The area shown is 6942200ha and the perimeter is 1054km
  • 4 sides of the AOI polygon are highlighted with a dashed line

2.

Click the button

  • The mode is active
  • No measurement is shown

3.

Click on the map, move mouse and double-click on the map.

  • The line that was just drawn is shown as a dashed line.
  • The line's distance is shown in km.

4.

Click the button

  • The measurement geometry changes to a square, and the measurement value reflects it.

5.

Click the button

  • The measurement geometry changes to a line, and the measurement value reflects it.

6.

Click the button

  • The line measurement is removed from map.
  • The measurement value disappears.

7.

Click the button

  • The measurement geometry is shown as a square, and the measurement value reflects it.

8.

Click the button

  • The polygon measurement is removed from map.
  • The measurement value disappears.

Area of Interest

Open and close Import AOI dialog (v1.7.0)

Functional requirement

Import AOI button opens a modal dialog box.

Setup

Load Showcase !showcase application.

ActionExpected Result

1.

Click button.

2.

Click button.

  • The Import AOI dialog box is displayed as a modal dialog, preventing interaction with map behind it.

3.

Click anywhere on darkened map.

  • Nothing happens

4.

Click in top-right corner of dialog box.

  • Closes the dialog box.

5.

Click button.

6.

Click the Cancel button.

  • Closes the dialog box.

7.

Click button.

8.

Press the Esc key.

  • Closes the dialog box.

Upload a shapefile (v1.7.0)

Functional requirement

Import AOI lets user upload a shapefile

Setup

Load Showcase !showcase application.

Refer to Import examples for information on obtaining example files for testing.

The file needed for this test is valid/3-polygons.shp.

ActionExpected Result

1.

Click button.

2.

Click button.

3.

Click Choose file and select valid/3-polygons.shp from the location on your machine where the import examples were unzipped.

  • A message saying Ready to import 3 feature(s) is displayed.
  • The title field contains 3-polygons.

4.

Click the Add button.

  • The map zooms and centers on the features in the shapefile.
  • The 3 polygon features are displayed as AOI.

5.

Click button.

6.

Click Choose file and select valid/3-polygons.shp from the location on your machine where the import examples were unzipped.

7.

Click the Cancel button.

  • The map doesn't change.

Upload a KML (v1.7.0)

Functional requirement

Import AOI lets user upload a KML file or paste in KML geo-data.

Setup

Load Showcase !showcase application.

Refer to Import examples for information on obtaining example files for testing.

The file needed for this test is valid/3-polygons.kml

ActionExpected Result

1.

Click button.

2.

Click button.

3.

Click Choose file and select valid/3-polygons.kml from the location on your machine where the import examples were unzipped.

  • A message saying Ready to import 3 feature(s) is displayed.

4.

Click the Add button.

  • 3 polygon features are displayed as AOI.
  • The map zooms and centers on the AOI features.

1.

Click button.

5.

Click the From Data tab.

6.

Copy the KML sample geo-data from KML Example and paste it into the text entry field under Enter Geomark or text data.

  • A message saying Ready to import 1 feature(s) is displayed.

7.

Click the Add button.

  • 4 polygon features are displayed as AOI.
  • The map zooms and centers on the AOI features.

Upload a GPX (v1.7.0)

Functional requirement

Import AOI lets user upload a GPX file or paste in GPX geo-data.

Setup

Load Showcase !showcase application.

Refer to Import examples for information on obtaining example files for testing.

The file needed for this test is valid/3-linestrings.gpx

ActionExpected Result

1.

Click button.

2.

Click button.

3.

Click Choose file and select valid/3-linestrings.gpx from the location on your machine where the import examples were unzipped.

  • A message saying Ready to import 3 feature(s) is displayed.

4.

Click the Add button.

  • 3 linestring features are displayed as AOI.
  • The map zooms and centers on the AOI features.

1.

Click button.

5.

Click the From Data tab.

6.

Copy the GPX sample geo-data from GPX Example and paste it into the text entry field under Enter Geomark or text data.

  • A message saying Ready to import 1 feature(s) is displayed.

7.

Click the Add button.

  • 4 linestring features are displayed as AOI.
  • The map zooms and centers on the AOI features.

Upload a GeoJSON (v1.7.0)

Functional requirement

Import AOI lets user upload a GeoJSON file or paste in GeoJSON geo-data.

Setup

Load Showcase !showcase application.

Refer to Import examples for information on obtaining example files for testing.

The file needed for this test is valid/3-polygons.json

ActionExpected Result

1.

Click button.

2.

Click button.

3.

Click Choose file and select valid/3-polygons.json from the location on your machine where the import examples were unzipped.

  • A message saying Ready to import 3 feature(s) is displayed.

4.

Click the Add button.

  • 3 polygon features are displayed as AOI.
  • The map zooms and centers on the AOI features.

1.

Click button.

5.

Click the From Data tab.

6.

Copy the GeoJSON sample geo-data from GeoJSON Example and paste it into the text entry field under Enter Geomark or text data.

  • A message saying Ready to import 1 feature(s) is displayed.

7.

Click the Add button.

  • 4 polygon features are displayed as AOI.
  • The map zooms and centers on the AOI features.

Upload a WKT (v1.7.0)

Functional requirement

Import AOI lets user upload a WKT file or paste in WKT geo-data.

Setup

Load Showcase !showcase application.

Refer to Import examples for information on obtaining example files for testing.

The file needed for this test is valid/3-polygons.wkt

ActionExpected Result

1.

Click button.

2.

Click button.

3.

Click Choose file and select valid/3-polygons.wkt from the location on your machine where the import examples were unzipped.

  • A message saying Ready to import 3 feature(s) is displayed.

4.

Click the Add button.

  • 3 polygon features are displayed as AOI.
  • The map zooms and centers on the AOI features.

1.

Click button.

5.

Click the From Data tab.

6.

Copy the WKT sample geo-data from WKT Example and paste it into the text entry field under Enter Geomark or text data.

  • A message saying Ready to import 1 feature(s) is displayed.

7.

Click the Add button.

  • 4 polygon features are displayed as AOI.
  • The map zooms and centers on the AOI features.

Upload a CSV (Simple Text) (v1.7.0)

Functional requirement

Import AOI lets user upload a CSV file or paste in CSV geo-data.

Setup

Load Showcase !showcase application.

Refer to Import examples for information on obtaining example files for testing.

The file needed for this test is valid/3-polygons-collection.txt

ActionExpected Result

1.

Click button.

2.

Click button.

3.

Click Choose file and select valid/3-polygons-collection.txt from the location on your machine where the import examples were unzipped.

  • A message saying Ready to import 1 feature(s) is displayed.

4.

Click the Add button.

  • 1 polygon feature is displayed as AOI.
  • The map zooms and centers on the AOI feature.

1.

Click button.

5.

Click the From Data tab.

6.

Copy the CSV sample geo-data from Simple Text Example and paste it into the text entry field under Enter Geomark or text data.

  • A message saying Ready to import 1 feature(s) is displayed.

7.

Click the Add button.

  • 2 polygon features are displayed as AOI.
  • The map zooms and centers on the AOI features.

Upload a Geomark (v1.7.0)

Functional requirement

Import AOI lets user paste in Geomark geo-data.

Setup

Load Showcase !showcase application.

ActionExpected Result

1.

Click button.

2.

Click button.

3.

Click the From Data tab.

4.

Copy the Geomark URL from Geomark Example and paste it into the text entry field under Enter Geomark or text data.

  • A message saying Ready to import 1 feature(s) is displayed.

5.

Click the Add button.

  • 1 polygon feature is displayed as AOI.
  • The map zooms and centers on the AOI features.

Drag and drop file (v1.7.0)

Functional requirement

Import AOI allows a file to selected by dragging the file into the dialog box. The file must be dropped on the file chooser.

Setup

Load Showcase !showcase application.

Refer to Import examples for information on obtaining example files for testing.

The files needed for this test are:

  • valid/3-polygons.shp
ActionExpected Result

1.

Click button.

2.

Click button.

3.

Find valid/3-polygons.shp in the file-system where the import examples were unzipped using Explorer/Finder. Drag that file and drop it on the file chooser under the label Select spatial file.

  • A message saying Ready to import 3 feature(s) is displayed.

4.

Click the Add button.

  • The map zooms and centers on the features in the shapefile.

1.

Click button.

5.

Find valid/3-polygons.shp in the file-system where the import examples were unzipped using Explorer/Finder. Drag that file and drop it anywhere except on the file chooser under the label Select spatial file.

  • One of 2 different things will happen (depends on browser/OS)
  • Case 1: The browser page changes to show the file that was just dropped. In this case, the browser window no longer shows Showcase, but it can be regained by hitting Back button.
  • Case 2: The browser shows acts as if the file was just downloaded. In this case, the Add Layer dialog is unchanged.

Open and close Export AOI dialog (v1.7.0)

Functional requirement

button opens a modal dialog box.

Setup

Load Showcase !showcase application.

ActionExpected Result

1.

Click button.

  • button is disabled.

2.

Draw an AOI geometry.

  • button is enabled.

3.

Click button.

  • The Export AOI dialog box is displayed as a modal dialog, preventing interaction with map behind it.

4.

Click anywhere on darkened map.

  • Nothing happens

5.

Click in top-right corner of dialog box.

  • Closes the dialog box.

6.

Click button.

7.

Click the Close button.

  • Closes the dialog box.

8.

Click button.

9.

Press the Esc key.

  • Closes the dialog box.

Export as KML (v1.7.0)

Functional requirement

Export AOI will export current AOI as KML:

Setup

Load Showcase !showcase application.

Click on the Session button at top of window, select 'AOI Features', and click Load.

ActionExpected Result

1.

Click button.

2.

Click button.

3.

Select KML from format drop-down.

4.

Click Export button.

  • The AOI geometry is rendered in the chosen format, and appears in the Data Text box.

5.

Click on the Copy button.

  • A message saying KML copied is displayed.

6.

Click on the Close button.

7.

Click button.

  • All AOI features are cleared from the map.

8.

Click button.

9.

Click the From Data tab.

10.

Click in the text entry field under Enter Geomark or text data, and paste text in clipboard (Ctrl-V, or right-click and hit Paste).

  • A message saying Ready to import 5 feature(s) is displayed.

11.

Click the Add button.

  • The same 5 AOI features are displayed.
  • The map zooms and centers on the AOI features.

12.

Click button.

13.

Select KML from format drop-down.

14.

Click Export button.

  • The AOI geometry is rendered in the chosen format, and appears in the Data Text box.

15.

Click on the Download button.

  • A file named like cwm-export ... .kml is downloaded in the local computer.

Export as GPX (v1.7.0)

Functional requirement

Export AOI will export current AOI as GPX:

Setup

Load Showcase !showcase application.

Click on the Session button at top of window, select 'AOI Features', and click Load.

ActionExpected Result

1.

Click button.

2.

Click button.

3.

Select GPX from format drop-down.

4.

Click Export button.

  • The AOI geometry is rendered in the chosen format, and appears in the Data Text box.

5.

Click on the Copy button.

  • A message saying GPX copied is displayed.

6.

Click on the Close button.

7.

Click button.

  • All AOI features are cleared from the map.

8.

Click button.

9.

Click the From Data tab.

10.

Click in the text entry field under Enter Geomark or text data, and paste text in clipboard (Ctrl-V, or right-click and hit Paste).

  • A message saying Ready to import 5 feature(s) is displayed.

11.

Click the Add button.

  • The same 5 AOI features are displayed, except that the polygons (square, star & circle are not filled).
  • The map zooms and centers on the AOI features.

12.

Click button.

13.

Select GPX from format drop-down.

14.

Click Export button.

  • The AOI geometry is rendered in the chosen format, and appears in the Data Text box.

15.

Click on the Download button.

  • A file named like cwm-export ... .gpx is downloaded in the local computer.

Export as GeoJSON (v1.7.0)

Functional requirement

Export AOI will export current AOI as GeoJSON:

Setup

Load Showcase !showcase application.

Click on the Session button at top of window, select 'AOI Features', and click Load.

ActionExpected Result

1.

Click button.

2.

Click button.

3.

Select GeoJSON from format drop-down.

4.

Click Export button.

  • The AOI geometry is rendered in the chosen format, and appears in the Data Text box.

5.

Click on the Copy button.

  • A message saying GeoJSON copied is displayed.

6.

Click on the Close button.

7.

Click button.

  • All AOI features are cleared from the map.

8.

Click button.

9.

Click the From Data tab.

10.

Click in the text entry field under Enter Geomark or text data, and paste text in clipboard (Ctrl-V, or right-click and hit Paste).

  • A message saying Ready to import 5 feature(s) is displayed.

11.

Click the Add button.

  • The same 5 AOI features are displayed.
  • The map zooms and centers on the AOI features.

12.

Click button.

13.

Select GeoJSON from format drop-down.

14.

Click Export button.

  • The AOI geometry is rendered in the chosen format, and appears in the Data Text box.

15.

Click on the Download button.

  • A file named like cwm-export ... .geojson is downloaded in the local computer.

Export as WKT (v1.7.0)

Functional requirement

Export AOI will export current AOI as WKT:

Setup

Load Showcase !showcase application.

Click on the Session button at top of window, select 'AOI Features', and click Load.

ActionExpected Result

1.

Click button.

2.

Click button.

3.

Select WKT from format drop-down.

4.

Click Export button.

  • The AOI geometry is rendered in the chosen format, and appears in the Data Text box.

5.

Click on the Copy button.

  • A message saying WKT copied is displayed.

6.

Click on the Close button.

7.

Click button.

  • All AOI features are cleared from the map.

8.

Click button.

9.

Click the From Data tab.

10.

Click in the text entry field under Enter Geomark or text data, and paste text in clipboard (Ctrl-V, or right-click and hit Paste).

  • A message saying Ready to import 5 feature(s) is displayed.

11.

Click the Add button.

  • The same 5 AOI features are displayed.
  • The map zooms and centers on the AOI features.

12.

Click button.

13.

Select WKT from format drop-down.

14.

Click Export button.

  • The AOI geometry is rendered in the chosen format, and appears in the Data Text box.

15.

Click on the Download button.

  • A file named like cwm-export ... .wkt is downloaded in the local computer.

Export as CSV (v1.7.0)

Functional requirement

Export AOI will export current AOI as CSV (Simple Text):

Setup

Load Showcase !showcase application.

Click on the Session button at top of window, select 'AOI Features', and click Load.

ActionExpected Result

1.

Click button.

2.

Click button.

3.

Select Simple Text from format drop-down.

4.

Click Export button.

  • The AOI geometry is rendered in the chosen format, and appears in the Data Text box.

5.

Click on the Copy button.

  • A message saying Simple Text copied is displayed.

6.

Click on the Close button.

7.

Click button.

  • All AOI features are cleared from the map.

8.

Click button.

9.

Click the From Data tab.

10.

Click in the text entry field under Enter Geomark or text data, and paste text in clipboard (Ctrl-V, or right-click and hit Paste).

  • A message saying Ready to import 1 feature(s) is displayed.

11.

Click the Add button.

  • The original AOI features are re-created, except they are all merged into one geometry collection, and the point feature has become another vertex for the circle component.
  • The map zooms and centers on the AOI features.

12.

Click button.

13.

Select Simple Text from format drop-down.

14.

Click Export button.

  • The AOI geometry is rendered in the chosen format, and appears in the Data Text box.

15.

Click on the Download button.

  • A file named like cwm-export ... .txt is downloaded in the local computer.

Export as Geomark (v1.8.1)

Functional requirement

Export AOI will export current AOI as Geomark:

Setup

Load Showcase !showcase application.

Click on the Session button at top of window, select 'AOI Features', and click Load.

For v1.8.1, make sure the Geomark correctly exported.

ActionExpected Result

1.

Click button.

2.

Click button.

3.

Select Geomark from format drop-down.

4.

Click Export button.

  • The AOI is submitted to the Geomark service, and a unique URL is generated.
  • The Download button is disabled.

5.

Click on the Copy button.

  • A message saying Geomark copied is displayed.

6.

Click on the Close button.

7.

Click button.

  • All AOI features are cleared from the map.

8.

Click button.

9.

Click the From Data tab.

10.

Click in the text entry field under Enter Geomark or text data, and paste text in clipboard (Ctrl-V, or right-click and hit Paste).

  • A message saying Ready to import 1 feature(s) is displayed.

11.

Click the Add button.

  • The first AOI feature is re-created (the square).
  • The map zooms and centers on the AOI features.

Clear AOI geometries one at a time (v1.7.0)

Functional requirement

Able to clear any individual AOI geometry

Setup

Load Showcase !showcase application.

Click on the Session button at top of window, select 'AOI Features', and click Load.

ActionExpected Result

1.

Click button.

2.

Click button.

  • The AOI geometry list in the Geometry Calculator panel shows 5 features.

3.

Click beside 'Polygon - 6pts' in the geometry list in Geometry Calculator panel.

  • The star shaped AOI geometry is deleted.

4.

Again, click beside 'Linestring[5] - 5 pts' in the geometry list in Geometry Calculator panel.

  • The triangle shaped AOI geometry is deleted.

5.

Click on Delete Last button

  • The circle shaped AOI geometry is deleted.

Edit rectangle location (v1.8.1)

Functional requirement

Edit a rectangle, changing location.

Setup

Load Showcase !showcase application.

Click on the Session button at top of window, select 'AOI Features', and click Load.

ActionExpected Result

1.

Click button.

2.

Click on the button

3.

Click on the rectangle

  • The rectangle turns red
  • A control point appears in the center

4.

Drag the center control point

  • The AOI rectangle is moved

Edit polygon location (v1.8.1)

Functional requirement

Edit a polygon, changing location.

Setup

Load Showcase !showcase application.

Click on the Session button at top of window, select 'AOI Features', and click Load.

ActionExpected Result

1.

Click button.

2.

Click on the button

3.

Click on the rough star shape

  • The star turns red
  • A control point appears in the center

4.

Drag the center control point

  • The AOI star is moved

Edit circle location (v1.8.1)

Functional requirement

Edit a circle, changing location.

Setup

Load Showcase !showcase application.

Click on the Session button at top of window, select 'AOI Features', and click Load.

ActionExpected Result

1.

Click button.

2.

Click on the button

3.

Click on the circle

  • The circle turns red
  • A control point appears in the center

4.

Drag the center control point

  • The AOI circle is moved

Edit linestring location (v1.8.1)

Functional requirement

Edit a linestring, changing location.

Setup

Load Showcase !showcase application.

Click on the Session button at top of window, select 'AOI Features', and click Load.

ActionExpected Result

1.

Click button.

2.

Click on the button

3.

Click on the linestring

  • The linestring turns red
  • A control point appears in the center

4.

Drag the center control point

  • The AOI linestring is moved

Buffering AOI uses BC Albers (v1.8.1)

Functional requirement

When an AOI feature is buffered, the distance is calculated using the BC Albers projection. This projection is also used by the measurement tool.

Setup

Load Showcase !showcase application.

Click on the Session button at top of window, select 'AOI Buffer', and click Load.

ActionExpected Result

1.

Click button.

  • Opens bookmarks panel to right of navigation toolbar.

2.

Click on Northwest in bookmark panel.

  • The map zooms to northwest corner of province

  • Two AOI features are visible, each an L-shape, one on top of the other.

3.

Click button.

  • The AOI feature list shows two MultiLineStrings, each with 12 points.

4.

Enter '1000' in the entry field beside the button.

5.

Click button.

  • The orange linestring feature on the map is buffered by 1000m.

  • The first feature in the AOI feature list changes to a MultiPolygon with 180 points

6.

Click button.

  • The orange Polygon is intersected with the blue linestring.

  • Two short AOI line segments are visible.

  • The AOI feature list shows one MultiLineString, with 16 points.

7.

Click button.

  • Opens bookmarks panel to right of navigation toolbar.

8.

Click on Southwest

  • The map zooms to southwest corner of province.

  • Two short AOI line segments are visible.

9.

Click on Northeast

  • The map zooms to northeast corner of province.

  • Two short AOI line segments are visible.

10.

Click on Southeast

  • The map zooms to southeast corner of province.

  • Two short AOI line segments are visible.

11.

Click button.

  • Measurement panel is shown

  • The AOI feature is used as the geometry to be measured.

  • The panel shows a measurement for distance of exactly 16km, which is 2km for each of the 8 pieces of the multi-linestring.

Geomark parser is not sensitive to application protocol (v1.7.0)

Functional requirement

Geomark parser doesn't depend on protocol used to load application

Setup

Load Showcase !showcase application using https.

ActionExpected Result

1.

Draw an AOI.

2.

Export it to GeoMark. Remember the GeoMark URL.

  • Geomark URL will start with http://

3.

Import AOI, and specify previously created geomark URL.

  • The Geomark will load correctly.

AOI Tools show information about usage (v1.7.0)

Functional requirement

When an AOI tool is hovered over, a popup panel shows usage information for the tool.

Setup

Load Showcase !showcase application.

ActionExpected Result

1.

Click button.

2.

Hover over

  • A tool information panel is displayed

3.

Hover over

  • A tool information panel is displayed

4.

Hover over

  • A tool information panel is displayed

5.

Hover over

  • A tool information panel is displayed

6.

Hover over

  • A tool information panel is displayed

7.

Hover over

  • A tool information panel is displayed

Undo, Redo AOI edit buttons (v1.7.0)

Functional requirement

When there is no AOI edit action to undo or redo, the buttons should be disabled.

Setup

Load Showcase !showcase application.

ActionExpected Result

1.

Click button.

  • is disabled, is disabled

2.

Draw an AOI rectangle.

  • is ENABLED, is disabled

3.

Click button.

  • is disabled, is ENABLED

4.

Click button.

  • is ENABLED, is disabled

5.

Click button.

  • is disabled, is ENABLED

6.

Draw an AOI rectangle.

  • is ENABLED, is disabled

Zoom to AOI button (v1.7.0)

Functional requirement

When there is no AOI geometry, the button should be disabled.

Setup

Load Showcase !showcase application.

ActionExpected Result

1.

Click button.

  • is disabled

2.

Draw an AOI rectangle.

  • is ENABLED

3.

Click button.

  • is disabled

Clear AOI button (v1.7.0)

Functional requirement

When there is no AOI geometry, the button should be disabled.

Setup

Load Showcase !showcase application.

ActionExpected Result

1.

Click button.

  • is disabled

2.

Draw an AOI rectangle.

  • is ENABLED

3.

Click button.

  • is disabled

Export AOI button (v1.7.0)

Functional requirement

When there is no AOI geometry, the button should be disabled.

Setup

Load Showcase !showcase application.

ActionExpected Result

1.

Click button.

  • is disabled

2.

Draw an AOI rectangle.

  • is ENABLED

3.

Click button.

  • is disabled

Convert to COGO button (v1.7.0)

Functional requirement

When there is no AOI geometry, the Convert to COGO button on the COGO panel should be disabled.

Setup

Load Showcase !showcase application.

ActionExpected Result

1.

Click button.

  • Convert to COGO is disabled

2.

Click button.

  • Convert to COGO is disabled

3.

Draw an AOI rectangle.

  • Convert to COGO is ENABLED

4.

Click button.

  • Convert to COGO is disabled

Status panel controls AOI geometries (v1.8.0)

Functional requirement

The AOI status panel shows information about the current AOI geometries, and allows the user to manage them.

Setup

Load Showcase !showcase application.

Click on the Session button at top of window, select 'AOI Features', and click Load.

ActionExpected Result

1.

Click button.

  • The AOI Status panel at the bottom edge of the map is displayed.
  • It shows Features 5, Area 4093 ha, Perimeter 62.18 km.

2.

Click on the beside the feature count in the AOI status panel.

  • The AOI status panel expands to show a list of the AOI features.
  • The top one is orange
  • The rest are blue with and buttons

3.

Click on beside Polygon - 6 pts

  • The star AOI polygon is removed.

4.

Click on beside LineString[5] - 5 pts

  • The triangle AOI linestring moves to the top of the list, and is now orange.

Memory is preserved across reloads (v1.8.0)

Functional requirement

When an AOI feature is saved to the AOI memory, that memory is preserved within the browser across reloads of the map. The memory is saved within the browser, and it not accessible to other instances of the map running in different browsers or on different machines.

Setup

Load Showcase !showcase application.

Click on the Session button at top of window, select 'AOI Features', and click Load.

ActionExpected Result

1.

Click button.

2.

Click button.

  • The Calculator panel opens
  • The top of the feature list in the Calculator panel says AOI memory is empty.

3.

Click on the button.

  • The top of the feature list in the Calculator panel says Polygon - 5 pts.

4.

Click button.

  • The feature list is cleared in the Calculator panel, except for the first row
  • The top of the feature list in the Calculator panel says Polygon - 5 pts.
  • The saved AOI feature is shown on the map in gray

5.

Click button.

  • The Calculator panel closes.
  • The gray rectangle of the AOI memory is not visible

6.

Reload the Showcase page, using browser's reload button.

  • The showcase is reloaded, and reset to its initial state

7.

Click button.

8.

Click button.

  • The saved AOI feature is shown on the map in gray (it will be very small)

9.

Click on Polygon - 5 pts in the feature list in the Calculator panel.

  • The map zooms to center the memory AOI on the screen.

10.

Open the Showcase in a different browser than the one you've been using.

11.

Click button.

12.

Click button.

  • The top of the feature list in the Calculator panel says AOI memory is empty.

AOI Tool stays active (v1.9.0)

Functional requirement

After drawing an AOI geometry, the tool stays active.

Setup

Load Showcase !showcase application.

ActionExpected Result

1.

Click button.

2.

Click on the button.

3.

Draw a rectangle on the map.

  • An AOI rectangle is placed on the map
  • The is still active

4.

Draw another rectangle on the map.

  • A second AOI rectangle is placed on the map
  • The is still active

5.

Repeat the last 3 steps for , , , and .

AOI Tool captures mouse (v1.9.0)

Functional requirement

When drawing with an AOI tool, moving the mouse out of the map does not cancel drawing.

Setup

Load Showcase !showcase application.

ActionExpected Result

1.

Click button.

2.

Click on the button.

3.

Draw a rectangle on the map and move mouse out of map while drawing rectangle

  • The drawing stays in progress when mouse is outside of map

4.

Repeat the previous step for , , , and .

Identify

One identify request for each layer being queried (v1.7.0)

Functional requirement

Each layer in an overlay will be queried seperately when do an identify request.

Setup

Load Showcase !showcase application.

Click on the Session button at top of window, select 'Identify Features', and click Load.

ActionExpected Result

1.

Click button.

2.

Click inside the blue star in the center of the map.

  • The Identify Features toolbar will show a fast changing display of the layers awaiting results that starts at about 50, and counts down.
  • The Identify panel will show at one or more features from at least 11 layers.

The pending requests to layers can be cancelled (v1.7.0)

Functional requirement

When querying many layers, the pending requests can be cancelled.

Setup

Load Showcase !showcase application.

Click on the Session button at top of window, select 'Identify Features', and click Load.

ActionExpected Result

1.

Click button.

2.

Click inside the blue star in the center of the map.

  • The Identify Features toolbar will show a fast changing display of the layers awaiting results that starts at about 50, and counts down.

3.

QUICKLY, click in the Identify Features toolbar.

  • The Identify Features toolbar reverts the drop-down list of layers.
  • The Identify panel will show at one or more features from some number of layers.

Identify against layers that differ only by style (v1.7.0)

Functional requirement

Do identify against layers that have the same name on geoserver, but use different styles.

Setup

Load Showcase !showcase application.

Click on the Session button at top of window, select 'Identify Cadastral', and click Load.

ActionExpected Result

1.

Click button.

2.

Click inside the blue star in the center of the map.

  • The Identify panel will show results for 2 features on 2 layers.

The maximum number of features that are returned for a layer is 1000 (v1.8.1)

Functional requirement

The maximum number of features that identify returns for a layer is 1000.

Setup

Load Showcase !showcase application.

Click on the Session button at top of window, select 'Identify many features', and click Load.

ActionExpected Result

1.

Click button.

2.

Click inside the red star in the center of the map.

  • The Identify panel will show about 480 features for "Crown Land Layers (from Tantalis) / Land Act Survey Parcels - Tantalis - Outlined".

Change the maximum number of features that are returned for a layer (v1.8.1)

Functional requirement

The maximum number of features that identify returns for a layer is 1000. This maximum can changed in the map configuration.

Setup

Load Showcase !showcase application.

Click on the Profile: drop-down at top of window, and select All tools, identify maximum 10 per layer. Wait for Showcase to reload.

Click on the Session button at top of window, select 'Identify many features', and click Load.

ActionExpected Result

1.

Click button.

2.

Click inside the red star in the center of the map.

  • The Identify panel will show 10 features for "Crown Land Layers (from Tantalis) / Land Act Survey Parcels - Tantalis - Outlined".

Identify highlight does not interfere with other highlights on map (v1.7.0)

Functional requirement

An identify highlight will not cause any another highlight on the map to disappear

Setup

Load Showcase !showcase application.

ActionExpected Result

1.

Click on the Highlight button at the top of the Showcase application.

2.

Under Enter Mineral Tenure IDs, enter: 589564 847034, and click Highlight button underneath.

  • The map zooms to 2 highlighted features.

3.

Click button.

4.

Click on map on one of the highlighted tenures.

  • The Identify panel will show results for 2 features on 2 layers.

5.

Hover the mouse over each of the features.

  • Each feature in the Identify panel will be highlighted on the map, but the features highlighted by the Highlight demo will remain so.

6.

Close the Identify panel.

  • The features highlighted by the Highlight demo are still highlighted.

Identify behaviour can be controlled by application (v1.7.0)

Functional requirement

Identify has a default behaviour, that shows the geometry and attributes of all the features under the point that is clicked on. This behaviour can be changed by the application. The application can decide if the identify panel is displayed, and which layers are displayed in the identify panel.

Setup

Load Showcase !showcase application.

Click on the Session button at top of window, select 'Identify Features', and click Load.

ActionExpected Result

1.

Click button.

2.

Click inside the blue star in the center of the map.

  • The Identify panel will show at one or more features from at least 8 layers.

3.

Click on the Identify button at the top of the showcase window

4.

Click on the Clear Indentified Features button

  • The Identify panel will close.

5.

Click to turn off the Automatically Display Features checkbox

  • The Handle features for layer drop-down is displayed, and it shows a value of Mineral Tenure Grid.
  • The Show Unhandled Features checkbox is displayed

6.

Click inside the blue star in the center of the map.

  • The Identify Features toolbar will show a fast changing display of the layers awaiting results that starts at about 50, and counts down.
  • The Identify panel will not be shown.

7.

Change the Handle features for layer drop-down to Land Act Survey Parcels - Tantalis - Outlined.

8.

Click inside the blue star in the center of the map.

  • The Identify Features toolbar will show a fast changing display of the layers awaiting results that starts at about 50, and counts down.
  • The Identify panel will not be shown.
  • The attributes of 5 features from Land Act Survey Parcels - Tantalis - Outlined will be displayed in right-side panel.

9.

Click to turn of Show Unhandled Features checkbox

10.

Click on the Clear Indentified Features button

  • The Land Act Survey Parcels - Tantalis - Outlined features are removed

11.

Click inside the blue star in the center of the map.

  • The Identify Features toolbar will show a fast changing display of the layers awaiting results that starts at about 50, and counts down.
  • The Identify panel will be shown, but will not show features from Land Act Survey Parcels - Tantalis - Outlined.
  • The attributes of 5 features from Land Act Survey Parcels - Tantalis - Outlined will be displayed in right-side panel.

Identify panel allows interaction with features (v1.7.0)

Functional requirement

When features are displayed in the identify panel, each feature can be centered on or copied to the AOI.

Setup

Load Showcase !showcase application.

Click on the Session button at top of window, select 'Identify Cadastral', and click Load.

ActionExpected Result

1.

Click button.

2.

Click inside the blue star in the center of the map.

  • The Identify panel will show at one or more features from at least 3 layers.

3.

Click on each Feature row in the Identify panel.

  • The feature will be highlighted on the map and the map will zoom to put that feature in the center.

4.

Click on the beside each Feature.

  • The map will show each feature's geometry as an AOI feature.
  • The first one has a orange outline, and the rest have a blue outline.

5.

Click button.

  • The AOI status display at the bottom of the map will shown the same number of AOI features as there were identified features.

Identify respects layer visibility (v1.9.0)

Functional requirement

A layer is only available for identify if:

  • it is visible
  • the group (overlay) containing is visible
  • the map is within the layer's visible scale range (if any)
Setup

Load Showcase !showcase application.

Click on the Session button at top of window, select 'Identify Cadastral', and click Load.

ActionExpected Result

1.

Click button.

  • The Private Land Layers group is visible
  • All other groups are turned off.

2.

Expand the Private Land Layers group.

  • All layers in the Private Land Layers group are visible

3.

Click button.

  • The identify panel is shown

4.

Expand the layers dropdown list in the identify panel.

  • All the layers in Private Land Layers are listed.

5.

Click inside the blue star in the center of the map.

  • The Identify panel will show at one or more features from at least 2 layers.

6.

Click on the button in navigation toolbar 4 times.

  • The map zooms out.
  • The cadastre features are not shown on map.
  • The names in the layer list under Private Land Layers are still marked visible, but are italicized.

7.

Expand the layers dropdown list in the identify panel.

  • The dropdown is disabled, and says '(No Layers)'

8.

Click inside the blue star in the center of the map.

  • The Identify panel will say 'No features identified'

9.

Click on the button in navigation toolbar once.

  • The map zooms in.
  • The cadastre features are shown on map.
  • The names in the layer list under Private Land Layers are marked visible, and are not italicized.

10.

Expand the layers dropdown list in the identify panel.

  • All the layers in Private Land Layers are listed.

11.

Click inside the blue star in the center of the map.

  • The Identify panel will show at one or more features from at least 2 layers.

12.

Click the checkbox beside Private Land Layers in the layer list.

13.

Expand the layers dropdown list in the identify panel.

  • The dropdown is disabled, and says '(No Layers)'.

14.

Click inside the blue star in the center of the map.

  • The Identify panel will say 'No features identified'

Selection

Selecting features (v1.8.0)

Functional requirement
  • Pick a layer
  • Draw a shape and find all features on layer that intersect it
  • Find all features on layer that intersect the AOI
  • See attributes and geometry of features
  • Remove a feature from selection
  • Remove all features from selection
  • Copy a feature to AOI
  • Copy all features to AOI
Setup

Load Showcase !showcase application.

ActionExpected Result

1.

Click button.

  • Selection toolbar is displayed
  • Feature Selection panel is displayed

2.

Click on layer list drop-down in the selection toolbar.

  • All layer names in the list are disabled (have 🚫), as no layers are available for selection at this zoom level

3.

Click on button.

  • Feature Selection panel closes

4.

Click on button.

  • Feature Selection panel opens

5.

Click on the Session button at top of window, select 'Selection', and click Load.

  • The map zooms to Central Saanich, with a blue rectangle and a green triangle in the middle of the map.
  • The layer 'Mineral Tenure Grid' is selected in the layer list drop-down.
  • The and buttons are enabled, the and button is active, and all other buttons on the selection toolbar are disabled.

6.

Click until it shows the activated state

7.

Draw rectangle selection using the blue rectangle as a template

  • Feature Selection panel shows a status of Selected 4 features on 1 layer
  • The panel shows the one layer, Mineral Tenure Grid, with 4 features below it

8.

Hover mouse over Mineral Tenure Grid in the Feature Selection panel

  • All 4 selected features are highlighted on the map

9.

Hover mouse over each feature in the Feature Selection panel

  • Each selected features is highlighted in turn on the map

10.

Click the button beside the feature 092B11C030A

  • The feature is removed from the selection

11.

Click the button beside the feature 092B11C020D

  • The feature is copied to the AOI

12.

Click button.

  • The AOI status display at the bottom of the map will show 1 feature

13.

Click button.

14.

Click on layer list drop-down in the selection toolbar and select Land Act Survey Parcels - Tantalis - Outlined

15.

Click until it shows the activated state

16.

Draw polygon selection using the green triangle as a template

  • Feature Selection panel shows a status of Selected 5 features on 2 layers
  • The panel shows two layers, Mineral Tenure Grid, with 3 features below it, and Land Act Survey Parcels - Tantalis - Outlined with 2 feature

17.

Click the button beside the layer Mineral Tenure Grid

  • Feature Selection panel shows a status of Selected 2 features on 1 layer

18.

Click the button beside the layer Land Act Survey Parcels - Tantalis - Outlined

  • The features are copied to the AOI

19.

Click button.

  • The AOI status display at the bottom of the map will show 3 features

20.

Click button.

21.

Click on layer list drop-down in the selection toolbar and select Integrated Cadastral Fabric - Crown Ownership - All

22.

Click

  • Feature Selection panel shows a status of No features selected

23.

Click

  • Feature Selection panel shows a status of Selected 127 features on 1 layer
  • Only features that intersect the primary AOI are selected

24.

Click

25.

Draw rectangle selection using the blue rectangle as a template

  • Feature Selection panel shows a status of Selected 74 features on 1 layer

Select, unselect and select a feature again (v1.7.0)

Functional requirement

Select a feature, then unselect it. It is possible to select the feature again.

Setup

Load Showcase !showcase application.

ActionExpected Result

1.

Click eight times on button.

2.

Click button.

3.

Draw a rectangle in the middle of the map

4.

Click button.

5.

Draw a rectangle inside the selected cells

6.

Click button.

7.

Draw a rectangle over the cells just unselected.

  • All the cells that were unselected are able to be selected again.

Selection Tools show information about usage (v1.7.0)

Functional requirement

When a selection tool is hovered over, a popup panel shows usage information for the tool.

Setup

Load Showcase !showcase application.

ActionExpected Result

1.

Click button.

2.

Hover over

  • A tool information panel is displayed

3.

Hover over

  • A tool information panel is displayed

4.

Hover over

  • A tool information panel is displayed

Zoom to selection button (v1.7.0)

Functional requirement

When there is no selection, the Zoom to Selection button should be disabled.

Setup

Load Showcase !showcase application.

ActionExpected Result

1.

Click button.

  • disabled

2.

Click eight times on button.

  • disabled

3.

Select some cells.

  • ENABLED

4.

Click button.

  • disabled

5.

Select some cells.

  • ENABLED

6.

Click button.

  • ENABLED

7.

Unselect all selected cells.

  • disabled

Clear selection button (v1.7.0)

Functional requirement

When there is no selection, the Unselect All button should be disabled.

Setup

Load Showcase !showcase application.

ActionExpected Result

1.

Click button.

  • is disabled

2.

Click eight times on button.

  • is disabled

3.

Select some cells.

  • is ENABLED

4.

Click button.

  • is disabled

5.

Select some cells.

  • is ENABLED

6.

Click button.

  • is ENABLED

7.

Unselect all selected cells.

  • is disabled

Selected features show in printout (v1.9.0)

Functional requirement

Selected features are shown in the printout.

Setup

Load Showcase !showcase application.

Click on the Session button at top of window, select 'Selection', and click Load.

ActionExpected Result

1.

Click button.

  • Selection toolbar is displayed
  • Feature Selection panel is displayed
  • is active

2.

Draw rectangle selection

  • Some mineral tenure grid features are selected

3.

Click the button.

  • The Print Map dialog opens

4.

Select Quickprint from the Layout drop-down

5.

Click Print button

  • The print preview will show the selected mineral tenure grid features

Selection tool captures mouse (v1.9.0)

Functional requirement

When drawing with an selection tool, moving the mouse out of the map does not cancel drawing.

Setup

Load Showcase !showcase application.

ActionExpected Result

1.

Click button.

2.

Click on the button.

3.

Draw a rectangle on the map and move mouse out of map while drawing rectangle

  • The drawing stays in progress when mouse is outside of map

4.

Repeat the previous step for , and .

Markup

Draw rectangle (v1.8.0)

Functional requirement

Draw a rectangle markup

Setup

Load Showcase !showcase application.

ActionExpected Result

1.

Click button.

2.

Click button till it is active.

  • The style panel is displayed below the markup toolbar
  • The default colour is red
  • The default line style is solid

3.

Draw a rectangle on the map

  • A red, solid rectangle is drawn

4.

Click button

5.

Change the drawing colour to green

6.

Change the drawing line style to dotted

7.

Draw a rectangle on the map

  • A green, dotted rectangle is drawn

Draw polygon (v1.8.0)

Functional requirement

Draw a polygon markup

Setup

Load Showcase !showcase application.

ActionExpected Result

1.

Click button.

2.

Click button.

  • The style panel is displayed below the markup toolbar
  • The default colour is red
  • The default line style is solid

3.

Draw a polygon on the map

  • A red, solid polygon is drawn

4.

Click button.

5.

Change the drawing colour to green

6.

Change the drawing line style to dotted

7.

Draw a polygon on the map

  • A green, dotted polygon is drawn

Draw circle (v1.8.0)

Functional requirement

Draw a circle markup

Setup

Load Showcase !showcase application.

ActionExpected Result

1.

Click button.

2.

Click button.

  • The style panel is displayed below the markup toolbar
  • The default colour is red
  • The default line style is solid

3.

Draw a circle on the map

  • A red, solid circle is drawn

4.

Click button.

5.

Change the drawing colour to green

6.

Change the drawing line style to dotted

7.

Draw a circle on the map

  • A green, dotted circle is drawn

Draw linestring (v1.8.0)

Functional requirement

Draw a linestring markup.

Setup

Load Showcase !showcase application.

ActionExpected Result

1.

Click button.

2.

Click button.

  • The style panel is displayed below the markup toolbar
  • The default colour is red
  • The default line style is solid

3.

Draw a linestring on the map

  • A red, solid linestring is drawn

4.

Click button.

5.

Change the drawing colour to green

6.

Change the drawing line style to dotted

7.

Draw a linestring on the map

  • A green, dotted linestring is drawn

Draw point (v1.8.0)

Functional requirement

Draw a point markup.

Setup

Load Showcase !showcase application.

ActionExpected Result

1.

Click button.

2.

Click button.

  • The style panel is displayed below the markup toolbar
  • The default colour is red
  • The default point style is a extra-small (XS) circle
  • The default font style is serif, medium, black
  • The input focus is in the label field
  • The coordinate drop-down says No coordinate

3.

Click on the map to place a point

  • A small red circle is placed on the map

4.

Click button.

5.

Change the drawing colour to green

6.

Change the point type to a star

7.

Click on the map to place a point

  • A small green star is placed on the map

8.

Click button.

9.

Type Test Label into label field

  • The label is displayed with the point as it moved around the map

10.

Click on the map to place a point

  • A small green star with the label 'Test Label' is placed on the map

11.

Click button.

12.

Click the coordinate drop-down and pick DD

  • The coordinate is displayed with the point as it moved around the map

13.

Click on the map to place a point

  • A small green star with the coordinate of it's location is placed on the map

Draw label (v1.8.0)

Functional requirement

Draw a label markup.

Setup

Load Showcase !showcase application.

ActionExpected Result

1.

Click button.

2.

Click button.

  • The style panel is displayed below the markup toolbar
  • The default font style is serif, medium, black
  • The input focus is in the label field
  • The coordinate drop-down says No coordinate

3.

Type Test Label into label field

  • The label is displayed with the point as it moved around the map

4.

Click on the map to place a point

  • A label 'Test Label' is placed on the map

5.

Click button.

6.

Click the coordinate drop-down and pick DD

  • The coordinate is displayed with the point as it moved around the map

7.

Click on the map to place a point

  • A label with the coordinate of it's location is placed on the map

Edit rectangle (v1.8.0)

Functional requirement

Edit a rectangle, changing geometry or style.

Setup

Load Showcase !showcase application.

Click on the Session button at top of window, select 'Selection', and click Load.

ActionExpected Result

1.

Click button.

2.

Click on the button

3.

Click on the red rectangle

  • The rectangle is augmented with handles at the corners, edges and center.
  • The style panel opens, showing the rectangle's colour and line style.

4.

Drag a corner handle to change shape of rectangle

5.

Drag the center handle to move the rectangle

6.

Change the colour and line style in the style panel to change the rectangle's style.

Edit polygon (v1.8.0)

Functional requirement

Edit a polygon, changing geometry or style.

Setup

Load Showcase !showcase application.

Click on the Session button at top of window, select 'Selection', and click Load.

ActionExpected Result

1.

Click button.

2.

Click on the button

3.

Click on the purple polygon

  • The polygon is augmented with handles at the corners, edges and center.
  • The style panel opens, showing the polygon's colour and line style.

4.

Drag a corner handle to change shape of polygon

5.

Drag the center handle to move the polygon

6.

Change the colour and line style in the style panel to change the polygon's style.

Edit circle (v1.8.0)

Functional requirement

Edit a circle, changing geometry or style.

Setup

Load Showcase !showcase application.

Click on the Session button at top of window, select 'Selection', and click Load.

ActionExpected Result

1.

Click button.

2.

Click on the button

3.

Click on the blue circle

  • The circle is augmented with handles at the lower-right and center.
  • The style panel opens, showing the circle's colour and line style.

4.

Drag a corner handle to change the size of circle

5.

Drag the center handle to move the circle

6.

Change the colour and line style in the style panel to change the circle's style.

Edit linestring (v1.8.0)

Functional requirement

Edit a linestring, changing geometry or style.

Setup

Load Showcase !showcase application.

Click on the Session button at top of window, select 'Selection', and click Load.

ActionExpected Result

1.

Click button.

2.

Click on the button

3.

Click on the orange dashed linestring

  • The linestring is augmented with handles at the corners, edges and center.
  • The style panel opens, showing the linestring's colour and line style.

4.

Drag a corner handle to change shape of linestring

5.

Drag the center handle to move the linestring

6.

Change the colour and line style in the style panel to change the linestring's style.

Edit point or label (v1.8.0)

Functional requirement

Edit a point or label, changing geometry or style.

Setup

Load Showcase !showcase application.

Click on the Session button at top of window, select 'Selection', and click Load.

ActionExpected Result

1.

Click button.

2.

Click on the button

3.

Click on the small brown circle

  • The small brown circle gets a heavy border, and a more transparent interior
  • The style panel opens, showing the point's symbol style, and label style

4.

Drag the point to move it

5.

Change the colour and symbol style in the style panel to change the point's style.

6.

Click on 'Test Label 2'

  • The small brown cross gets a heavy border, and a more transparent interior
  • The style panel opens, showing the point's symbol style, and label style

7.

Drag the point to move it

8.

Change the colour and symbol style in the style panel to change the point's style.

9.

Change the coordinate style of the point

10.

Change the label of the point

Clear markup (v1.8.0)

Functional requirement

Clear individual markup features or the entire set of markup features.

Setup

Load Showcase !showcase application.

Click on the Session button at top of window, select 'Selection', and click Load.

ActionExpected Result

1.

Click button.

2.

Click on red rectangle.

3.

Click on button.

  • Rectangle is deleted.

4.

Click on blue circle.

5.

Click on button.

  • Circle is deleted.

6.

Click on small brown circle.

7.

Click on button.

  • Point is deleted

8.

Click button.

  • All remaining markup is deleted.

1.

Click button.

  • is disabled

9.

Draw a markup rectangle.

  • is ENABLED

10.

Click button.

  • is disabled

Zoom to markup (v1.8.0)

Functional requirement

Zoom map to make markup visible.

Setup

Load Showcase !showcase application.

Click on the Session button at top of window, select 'Selection', and click Load.

ActionExpected Result

1.

Click

  • Map shows whole province

2.

Click button.

  • The map is zoomed to show the markup features.

3.

Click button.

  • All markup is deleted.
  • The button is disabled

User drawn markup seperate from application markup (v1.8.0)

Functional requirement

The application can create markup that the user can't edit.

Setup

Load Showcase !showcase application.

ActionExpected Result

1.

Click the Markup button at the top of the Showcase application.

2.

Click on the Create button in the Markup side panel.

3.

Click button.

4.

Click button.

5.

Click on the polygon over Vancouver Island.

  • The markup over Vancouver Island is unaffected.

6.

Click button.

  • The markup over Vancouver Island is unaffected.

Markup Tools show information about usage (v1.7.0)

Functional requirement

When a markup tool is hovered over, a popup panel shows usage information for the tool.

Setup

Load Showcase !showcase application.

ActionExpected Result

1.

Click button.

2.

Hover over

  • A tool information panel is displayed

3.

Hover over

  • A tool information panel is displayed

4.

Hover over

  • A tool information panel is displayed

5.

Hover over

  • A tool information panel is displayed

6.

Hover over

  • A tool information panel is displayed

7.

Hover over

  • A tool information panel is displayed

8.

Hover over

  • A tool information panel is displayed

Markup tool captures mouse (v1.9.0)

Functional requirement

When drawing with a markup tool, moving the mouse out of the map does not cancel drawing.

Setup

Load Showcase !showcase application.

ActionExpected Result

1.

Click button.

2.

Click on the button.

3.

Draw a rectangle on the map and move mouse out of map while drawing rectangle

  • The drawing stays in progress when mouse is outside of map

4.

Repeat the previous step for , , , , and .

Highlighting

Clear highlight button (v1.7.0)

Functional requirement

When there is no highlight, the Clear Highlight button should be disabled.

Setup

Load Showcase !showcase application.

ActionExpected Result

1.

Click the Highlight button at the top of the Showcase application.

  • is disabled

2.

Click Clear button on panel to left.

3.

Under Enter tenure IDs, put: 1021165 851954 1021162.

4.

Click the Highlight button in the application side panel.

  • is ENABLED

5.

Click the button.

  • is disabled

Printing

Open and close Print dialog (v1.7.0)

Functional requirement

The Print Map button opens a modal dialog box.

Setup

Load Showcase !showcase application.

ActionExpected Result

1.

Click button.

  • The Print Map dialog box is displayed as a modal dialog, preventing interaction with map behind it.

2.

Click anywhere on darkened map.

  • Nothing happens

3.

Click in top-right corner of dialog box.

  • Closes the dialog box.

4.

Click button.

5.

Click the Cancel button.

  • Closes the dialog box.

6.

Click button.

7.

Press the Esc key.

  • Closes the dialog box.

Server print doesn't support all basemaps (v1.8.0)

Functional requirement

CWM Client will warn user when a base map is not supported by the print service.

Setup

Load Showcase !showcase application.

Click on the Session button at top of window, select 'Print', and click Load.

ActionExpected Result

1.

Click the base map chooser at the bottom and select BC Ortho Colour

  • The base map changes

2.

Click the button.

  • The Print Map dialog opens

3.

Select ANSI A from the Layout drop-down

  • The print dialog shows message The base map "BC Ortho Colour" is not supported by this print layout
Functional requirement

The server rendering will contain markup, AOI and user layers.

Setup

Load Showcase !showcase application.

Click on the Session button at top of window, select 'Print', and click Load.

ActionExpected Result

1.

Click the button.

  • The Print Map dialog opens

2.

Select ANSI A from the Layout drop-down

3.

Click Print button

  • The print window opens

Quick print markup, AOI, and user layers (v1.8.1)

Functional requirement

The quickprint rendering will contain markup, AOI and user layers.

For v1.8.1, make sure the user layer is respresented correctly in the print-out legend.

Setup

Load Showcase !showcase application.

Click on the Session button at top of window, select 'Print', and click Load.

ActionExpected Result

1.

Click the button.

  • The Print Map dialog opens

2.

Select Quickprint from the Layout drop-down

3.

Click Print button

  • The print window looking like this:

Bookmarks

Extent can be bookmarked (v1.7.0)

Functional requirement

An extent can be bookmarked, so that the extent can be returned to later.

Setup

Load Showcase !showcase application.

ActionExpected Result

1.

Click three times on button in navigation tools.

2.

Click button.

  • Opens bookmarks panel to right of navigation toolbar.

3.

Type 'test bookmark', and click to right of entry field.

  • test bookmark is added to list in bookmark panel.

4.

Click on button.

5.

Click on entry field in bookmark panel and type 'test bookmark 2', and click to right of entry field.

  • test bookmark 2 is added to list in bookmark panel.

6.

Click on test bookmark in bookmark panel.

  • Zooms map to extent saved for that bookmark.

7.

Click on test bookmark 2 in bookmark panel.

  • Zooms map to extent saved for that bookmark.

8.

Click button.

  • Closes bookmarks panel.

Bookmarks can be deleted (v1.7.0)

Functional requirement

An extent can be bookmarked, and the bookmark later deleted.

Setup

Load Showcase !showcase application.

ActionExpected Result

1.

Click three times on button in navigation tools.

2.

Click button.

3.

Type 'test bookmark', and click to right of entry field.

  • test bookmark is added to list in bookmark panel.

4.

Click beside test bookmark.

  • test bookmark is removed from list in bookmark panel.

Bookmarks are persistent (v1.7.0)

Functional requirement

Bookmarks are presisted between map sessions

Setup

Load Showcase !showcase application.

ActionExpected Result

1.

Click three times on button in navigation tools.

2.

Click button.

3.

Type 'test bookmark', and click to right of entry field.

  • test bookmark is added to list in bookmark panel.

4.

Reload the test application.

5.

Click button.

6.

Click on test bookmark in bookmark panel.

  • test bookmark is zooms to the correct extent.

Bookmarks panel not interfered with by other toolbars (v1.7.0)

Functional requirement

Bookmarks panel does not cover, and is not covered by other tool panels.

Setup

Load Showcase !showcase application.

ActionExpected Result

1.

Click button.

  • Bookmarks panel is displayed

2.

Click button.

  • AOI Tools toolbar is displayed, and Bookmarks is hidden.

3.

Click button.

  • Bookmarks toolbar is displayed, and AOI Tools is hidden.

4.

Click button.

  • Identify Features toolbar is displayed, and Bookmarks is hidden.

5.

Click button.

  • Bookmarks toolbar is displayed, and Identify Features is hidden.

6.

Click button.

  • Search toolbar is displayed, and Bookmarks is hidden.

7.

Click button.

  • AOI Tools toolbar is displayed, and Search is hidden.

Sessions

Save and load a session (v1.7.0)

Functional requirement

Save the map session into a file, and restore the session from that file. The session includes the state of:

  • Base Map
  • Map Extent
  • Layer Visibility
  • Imported Layers
  • AOI geometry
  • User Markup
Setup

Load Showcase !showcase application.

ActionExpected Result

1.

Use the base map chooser in bottom-right corner to change the base map to Bing Aerial.

2.

Click three times on button.

3.

Click button. Shift-click on the Mineral Titles overlay. Shift-click on the Private Land Layers overlay.

4.

Click button. Select purple color. Import a shapefile.

5.

Click button. Draw a rectangle, a polygon, a line, a point, and a circle.

6.

Click button. Draw a rectangle, a polygon, a line, a point, a circle, and a label, using different colours and styles for each one.

7.

Click button.

  • The Session Details will match the details of the map session.

8.

Click on Save button.

  • A file will be downloaded by the browser with a name starting with the current timestamp, and ending with .session.

9.

Reload the map application.

10.

Click button.

11.

Click Load tab.

12.

Click on Choose file and select the session file that was recently created.

  • The Session Details will match the details that were originally saved.

13.

Click on Load button.

  • The map will be restored to exactly the same state it was in when the session was saved.
  • The AOI undo history will be cleared. The and buttons are disabled.

Save is the default tab (v1.7.0)

Functional requirement

Save is made the default tab.

Setup

Load Showcase !showcase application.

ActionExpected Result

1.

Click button.

  • The Save is shown.

Title of button is 'Save / Load Session' (v1.7.0)

Functional requirement

Title of button is Save / Load Session

Setup

Load Showcase !showcase application.

ActionExpected Result

1.

Hover over session button

  • Tooltip is Save / Load Session

2.

Click on the button

  • Dialog title is Save / Load Session

Appendix

Import examples

Download import-examples.zip on your local machine, and unzip it. It contains two directories:

Some of the tests will reference files in this ZIP.

Geo-data examples

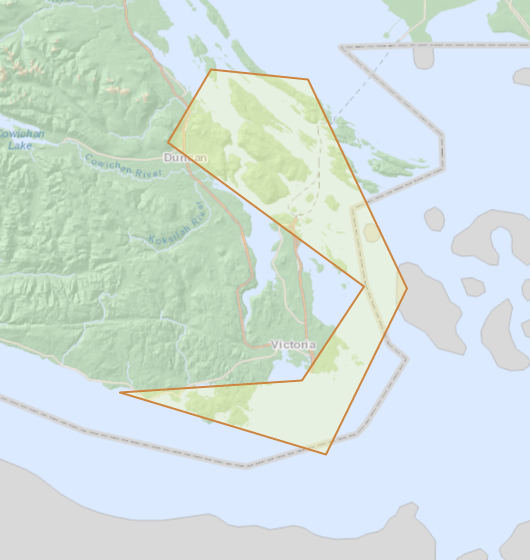
Here are sample geo-data objects for copying and pasting as text into CWM client. All of these geo-data objects represent the same geometry, a simple polygon that looks like this:

KML example

<kml xmlns="http://earth.google.com/kml/2.0">
 <Document>
  <Style id="cwmDefaultStyle">
   <LineStyle>
    <color>ff0000ff</color>
    <width>1</width>
   </LineStyle>
   <PolyStyle>
    <color>4c0000ff</color>
    <fill>1</fill>
    <outline>1</outline>
   </PolyStyle>
  </Style>
  <Folder>
   <name>Feature Export from CWM</name>
   <description>Exported from CWM on Mon, 02 May 2016 20:29:56 GMT</description>
   <Placemark>
    <styleUrl>#cwmDefaultStyle</styleUrl>
    <name>OpenLayers_Feature_Vector_127649</name>
    <description>No description available</description>
    <Polygon>
     <outerBoundaryIs>
      <LinearRing>
       <coordinates>
        -123.64611173160071,48.957190943397684
        -123.37969327460222,48.93915300107042
        -123.10778165354377,48.560666800258986
        -123.33025479804452,48.25801802692198
        -123.89605069641028,48.37126627006681
        -123.39617276679114,48.393156254308245
        -123.22588468087808,48.564302192015035
        -123.76421475892603,48.82536399117747
        -123.64611173160071,48.957190943397684
       </coordinates>
      </LinearRing>
     </outerBoundaryIs>
    </Polygon>
   </Placemark>
  </Folder>
 </Document>
</kml>

GPX example

<gpx version="1.1">
 <trk>
  <name> OpenLayers_Feature_Vector_127649</name>
  <desc> No description available</desc>
  <trkseg>
   <trkpt lon="-123.64611173160071" lat="48.957190943397684"/>
   <trkpt lon="-123.37969327460222" lat="48.93915300107042"/>
   <trkpt lon="-123.10778165354377" lat="48.560666800258986"/>
   <trkpt lon="-123.33025479804452" lat="48.25801802692198"/>
   <trkpt lon="-123.89605069641028" lat="48.37126627006681"/>
   <trkpt lon="-123.39617276679114" lat="48.393156254308245"/>
   <trkpt lon="-123.22588468087808" lat="48.564302192015035"/>
   <trkpt lon="-123.76421475892603" lat="48.82536399117747"/>
   <trkpt lon="-123.64611173160071" lat="48.957190943397684"/>
  </trkseg>
 </trk>
</gpx>

GeoJSON example

{
 "type": "FeatureCollection",
 "features": [
  {
   "type": "Feature",
   "properties": ,
   "geometry": {
    "type": "Polygon",
    "coordinates": [
     [
      [ -123.64611173160071, 48.957190943397684 ],
      [ -123.37969327460222, 48.93915300107042  ],
      [ -123.10778165354377, 48.560666800258986 ],
      [ -123.33025479804452, 48.25801802692198  ],
      [ -123.89605069641028, 48.37126627006681  ],
      [ -123.39617276679114, 48.393156254308245 ],
      [ -123.22588468087808, 48.564302192015035 ],
      [ -123.76421475892603, 48.82536399117747  ],
      [ -123.64611173160071, 48.957190943397684 ]
     ]
    ]
   }
  }
 ]
}

WKT example

POLYGON((
 -123.64611173160071 48.957190943397684,
 -123.37969327460222 48.93915300107042,
 -123.10778165354377 48.560666800258986,
 -123.33025479804452 48.25801802692198,
 -123.89605069641028 48.37126627006681,
 -123.39617276679114 48.393156254308245,
 -123.22588468087808 48.564302192015035,
 -123.76421475892603 48.82536399117747,
 -123.64611173160071 48.957190943397684
))

Simple text example

-123.64611173160071,48.957190943397684
-123.37969327460222,48.93915300107042
-123.10778165354377,48.560666800258986
-123.33025479804452,48.25801802692198
-123.89605069641028,48.37126627006681
-123.39617276679114,48.393156254308245
-123.22588468087808,48.564302192015035
-123.76421475892603,48.82536399117747
-123.64611173160071,48.957190943397684

Geomark example

gm-2F27C21FC19C4C53B3AF686406BFBFE5

If the above Geomark has expired, use:

gm-abcdefghijklmnopqrstuv0bcislands